This is me and my studio.

JK. This is me and my studio.

Much more simplified huh? Trust me, it may not look like much, but the laptop alone can pack a powerful punch. Many of today’s famous pop artists have been able to pack that punch with this wonderful tool/box that keeps getting flatter and flatter. We’re talking about artists like Avicii and Martin Garrix with FL Studio or Opia and Goldwash with Ableton Live. So… beware of the laptop , and more importantly, who ever wields it.
In this behind the scenes of our startup, Shuflix, I’m going to briefly go through how I made the jingle for this commercial (aka my process for making music with Ableton):
First is first. Where did the video come from? The video was masterfully edited in After Effects by Serg to welcome the visitors to the Shuflix website. The video was then passed on to me with the ultimate quest to find the ultimate jingle. I started searching for some fun songs because the video looked fun and upbeat. As I was searching, I paused and I thought, “hmmmmm… what if I wrote the jingle?” And thus, I got to work! (Disclaimer: I get a tiny bit technical, but I promise it’ll be digestible!)
The Mood
I am a firm believer in the magic born when music and video are put together. So, trying to pick the right feel for a visual stimulus is hard because what is right? I mean.. truly right?
When I was a wee lad I used to play this game called CokeMusic—you had a character and you’d mix loops together and make tracks. You’d then go to a map and play your mix! Thumbs up from peeps around the world would get you points. They had tons of electronic piano loops that always reminded me of summer (because that’s when I played the game). So, I thought to myself… “why not make a jingle that features an upbeat electric piano?” In fact, for nostalgia’s sake, I used one of those loops long ago to create a track with a friend. This time, however, I took out my trusty Akai LPK25 midi keyboard and jammed my heart out. The result: the very simple rift you hear at the very beginning of the jingle. (And no, Akai isn’t paying me… yet)
(Btw, we have some great video content coming your way when we do our official launch. The vids will have amazing backing tracks from some awesome composers including: Nathan Prillaman, Holder, and Joey Pecoraro!)
…Anyways, I started the jingle with two minor chords that progressed into a major chord. The reason for this was that resolving with a major sounds good but also gives this uplifting feeling of resolution and happy that we all love. I wanted to give that uplifting feel because the video itself is quick (it’s only 25 seconds!) and it’s exciting— I mean, with a single shake of the phone you can explore things to do from the thousands of activities near you! What’s not exciting about that? But, an upbeat rift is not enough to enhance the video’s excitement. I also need an upbeat beat!
The Rhythm
For percussion I put together some shakers panned all the way to the right, some bongos also panned to the right, a hi-hat rhythm panned to the left and a funky house beat with no pan. The panning widens the aural space and gives you the illusion that the sounds from the instruments are coming from different directions, almost as if you are right there listening LIVE !
The bassline was fun. At the very start of the jingle, we have a step-wise bass rhythm–commonly known as a walking bassline. Imagine each note ‘walking’ from one note to the next at each quarter note. Now this changes at the ‘mini drop’ to a funky less-on-point bassline. Now, imagine that each note is no longer walking from one to the next, but instead is dancing.
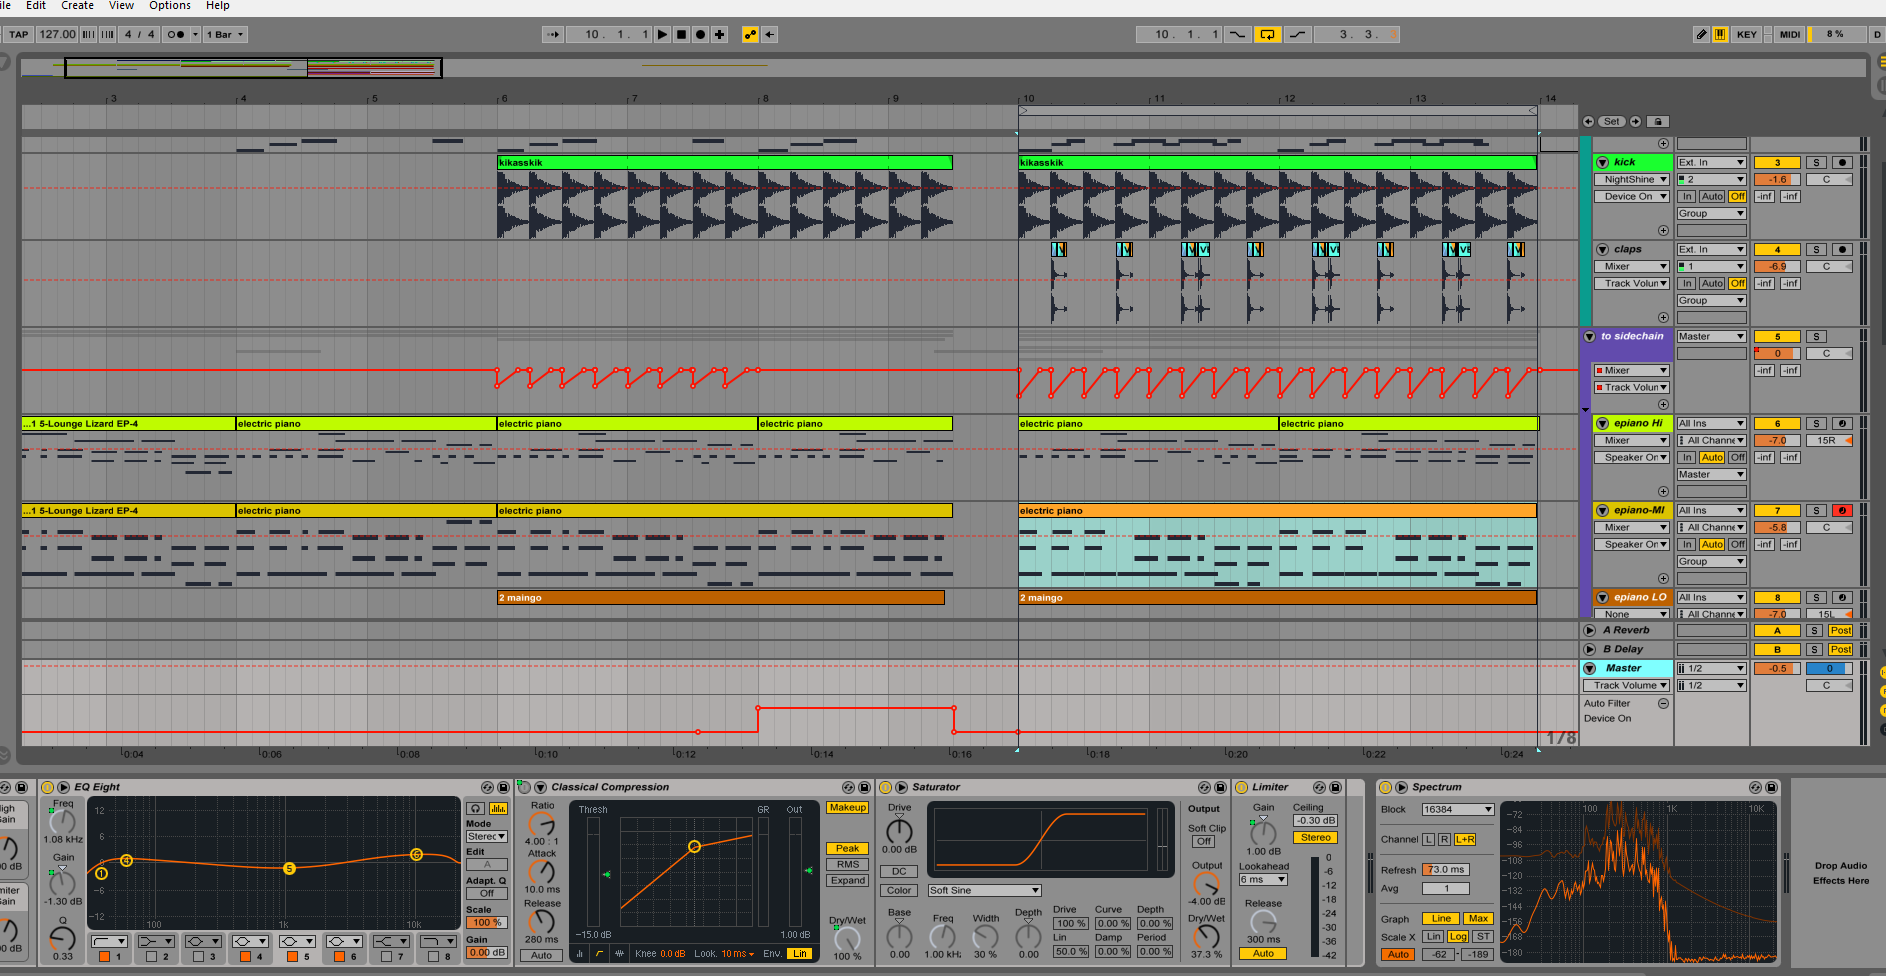
Finally, I added a kick drum that would perform as the classic Four-On-The-Floor. This classic kick on every beat of the 4/4 time signature gives it that Disco dancey feel. You feel it right? But wait, that’s not enough. The kick is drowning amongst the other sounds. So, in order to have that kick bounce out to the ears of the audience, there’s this thing called sidechaining. I cheat and instead of sidechaining sounds to the kick, I just manipulate their gain directly (aka I change volume without a compressor) to give the illusion that the kick is ‘ducking’ out the frequencies of the other sounds. This effect is what turns your shy head-nod into a full “I don’t care who sees me, I’m gonna dance because I’m beautiful!!!!!”
Jk. This jingle shouldn’t make you dance. It’s meant to keep you staring at the video clip forever. Mwahahah.
Jk again. I restrained myself from adding too much bass. So don’t worry, your head won’t ExPLodE. At most, it will nod aggressively (Remember this?).

Flourishes And Organization
After the main stuff is set, I added some flourishes and started organizing the jingle. The flourishes were simple, not overly complicated. I added a little bell twinkle at the very beginning because it helps set a happy mood.
I then added an underlying counter melody to the electric piano at a higher octave than the main rift. The counter melody shadows the chords of the main rift, but follows it’s own rhythm.
I then added another electric piano, patched it up with some reverb, some compression and most importantly, overdrive. The overdrive gives it the girthy distortion you hear a little bit after the walking bassline first comes in.
I added claps to act as snares. I added a beautiful flute sample whose frequencies were stretched to create the tiny anticipation you hear right before the ‘mini drop’. To soften the harshness of this stretch, I added some reverb. I added a tiny trumpet rift to accompany the latin/disco style rhythms. And as a little filler to provide an analog ambiance to the jingle, I added a vinyl scratch sample from Joedeshon available here.
Mix and Master
The last steps involved mixing and mastering the jingle. Ideally, you send the jingle to someone to mix it and then you send it to someone else to master it. At this point you’ve listened to the song so much, it’s hard to hear it as an external observer. However, this jingle isn’t about to hit the BBC’s Radio 1 Charts. It’s just a jingle. So, we can afford to slack off a bit. Heheh.
So, the mixing: To sum it up, I used Ableton’s EQ8 to de-emphasize the frequencies that weren’t essential for each of the tracks in order to make room for the other tracks that required those frequencies. For example, I lowered the gain on the mids of the hi-hats to make room for the electric piano since its the high frequencies of the hi-hats that catch our attention. I also added a bit of distortion to the bass guitar and EQ’d it to stand out a bit (learn why some frequencies appear to be lower in volume than others here: Fletcher Munson Curves)
For the master track, I added a chain composed of EQ8, a compressor, a saturator and a limiter. This was enough to boost and glue the different tracks together! Yay! (Oh, I also added a filter to create the effect right before the ‘mini drop’).
Now listen to it again: https://youtu.be/nhP0iIQGC-s
And… that’s a wrap!
Hi there! You made it to the bottom of this post. Congrats! As reward, watch this video to see what the pros do everyday in the studio (it’s 1 minute long):

You’re a boss with the camera for sure.
I was just looking for this info for some time.
After 6 hours of continuous Googleing, at last I got it in your website.
I wonder what is the lack of Google strategy that don’t rank
this type of informative web sites in top of the list.
Normally the top web sites are full of garbage.
What’s up, just wanted to mention, I liked this article. It was inspiring.Keep on posting!
I like the variations!